…or not. I started sewing the riding breeches yesterday, having disassembled the toile and used it as underlining. I corrected the slight fit problems on the too-narrow calves and knees by just cutting a tad wider by eye.
I went ahead and cut out lining in a rather thin denim, but may decide against it as it could make these too bulky. The beige twilled wool is very lofty, and although it presses well, there will be a lot of bulk in some seam allowances. I cut the whole lot out with pinking shears, to minimise fraying. I plan to catch all the seam allowances down to the underlining to keep them flat. I’ll judge later if I need to line them.
Darts sewn, CF and CB sewn and pressed, all good. I laid out the pieces and went through the pattern instructions very carefully to see how to do the pocket. Hmm. They didn’t look right, even on first reading. There are 2 faced pocket openings, and a folded pocket bag. The instructions have you cut out FOUR facings. I’d assumed this meant they would be piped/welt openings, ie one piece folded and used on each side of the slit…but no.
Unless I’m totally misreading, I was supposed to
- Baste the unfolded pocket bag to the OUTSIDE
- Place one facing over the marked line for the pocket opening, [also on the outside, so over the pocket bag]stitch 1/8″ either side and then cut in between the lines of stitching.
- Push through to the inside, and baste in place.
- Baste the pocket opening closed.
- On the inside, place another facing piece over the first one, and stitch it down.
- fold the pocket bag over and sew the curved edge.
Is it me? This sounds like a recipe for disaster, with a totally closed off’opening’ that is only as big as the facing, one facing piece sandwiched between trouser front and pocket, and one floating about inside the pocket bag…
I genuinely couldn’t suss it out, especially as the waist edge was to be finished first, so leaving the top of the pocket bag all exposed, and, as we already know, no mention of how to neaten that opening edge.
I decided to break free of the instructions, and do my own thing. This was a good idea, but not of course without issues.
Here are the steps I took.
- Basted the pocket bag, unfolded, to the INSIDE

- Sewed the two lines of stitching to attach the first facing piece to the right side, cut, and pushed it through to the inside, basting down the ‘piped’ edges and giving it a good press.

- Guessing that the other facing piece is to stop pocket lining from showing through the slit from the outside, I positioned it over the first, folded the pocket bag over, then pinned and machined the facing to the pocket bag. It doesn’t sound right, but looks fine from the outside anyway.
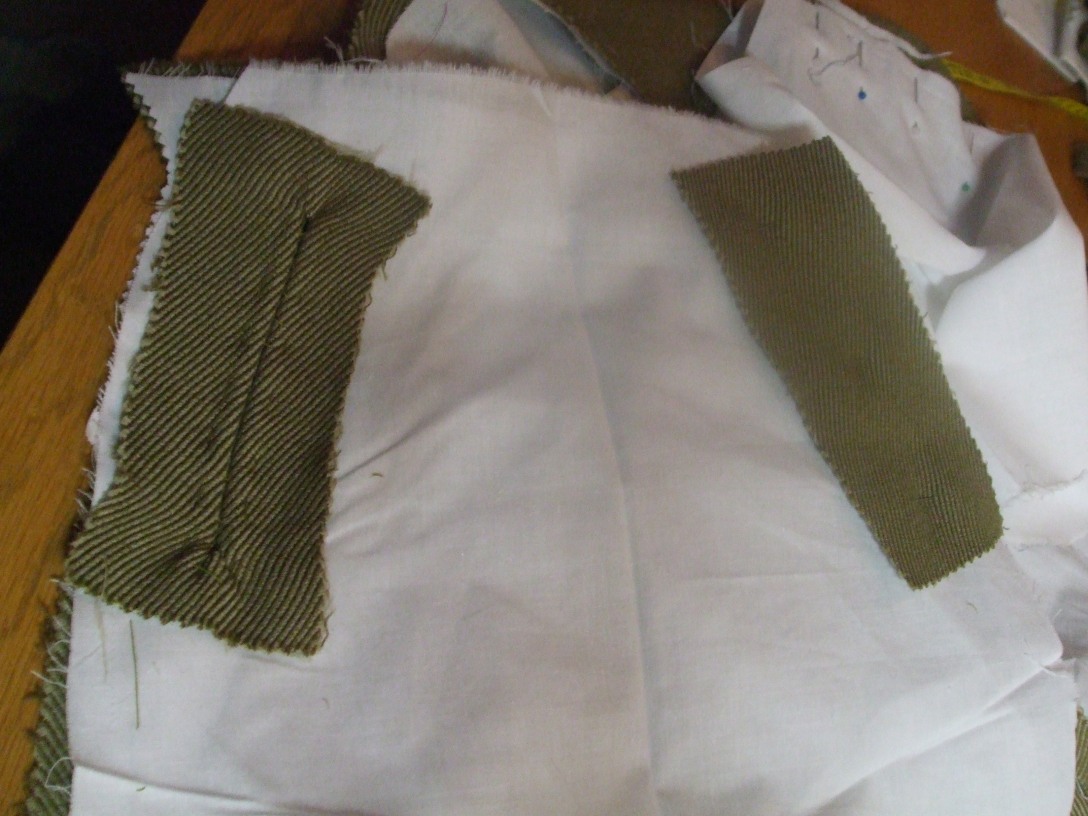

- Folded the pocket bags over, machined the curves, and basted all the many layers together at the hip edge.
And then I saw where I’d gone wrong.
When I reduced the curvature of the poofy jodhpur shaping, I should have moved the pocket slit. The pattern is very clearly marked, in capital letters no less, saying the slit should be 2″ from the raw edges. This is to allow space for those lovely buttonholes.

I didn’t do it, did I?
Bum!
Those openings are only just over an inch from the raw edge, which has to be neatened. This wool has quite a hefty turn of cloth, so I’ll lose a fair amount of that inch. Double bum!
Serves me right really.
Options [as I see them]:
- Bind the edge, make the buttons non functional, and go for press-stud fastening hidden by the buttons
- Add a ‘feature’ button band [but bulk will be a serious issue]
- Cry, throw it all in the corner, and make up the denim ones.
What would you do?

I would be heartbroken. But I would start again, but given the heft of the cloth maybe choose something a bit lighter and softer.
LikeLike
I think the denim will get made up, I quite like the idea of jodhpur-jeans… still cursing about the gorgeous wool though.
LikeLike
Well, first I’d yell Triple bumBumBUM and go and make a cup of tea.
Then, as I’d be loath to waste this fabric and the work I’d done on the pocket so far, I’d go with option 1. Or, (and I haven’t got the project in front of me so only you know if this is feasible) I’d look into making the right opening wider, (could you use buttons as far as is authentic, and then poppers below?) and I’d sew the left side closed, making it a mock opening with buttons etc. So much for my pennyworth 🙂
Nice bound pocket by the way.
Good luck with this
baci Sallyx
sarsaparillasal.blogspot.com
LikeLike
Yup, the air was blue. [With purple bits.] I was so intent on the ruddy assembly, I got distracted from the placement. I still don’t think the assembly is right either, but it looks good from the outside, which is the main thing!
I think you’re right about sewing one side shut, and perhaps if I contrive a button band using a single layer of the wool [that lovely selvage] and back it with lining fabric, I’d keep the bulk under control. I’ll experiment in a bit…
LikeLike
I would have chucked them in the naughty corner for the night then gone and had a stiff drink. Option one sounds the best. Just close off one side or maybe you could close of both with mock buttonholes and put a zip in them somewhere (back seam???). They would look the same and you could get in and out of them at least. It would be a shame to waste that lovely fabric. P.S. I have some pics on my blog you might like from an exhibition I was at yesterday. When I saw the wedding dress I thought of your trims. Xx
LikeLiked by 1 person
oooh I’m off to peek. Quite like the zip idea, no fuss with making the sides open at all… Nice one!
LikeLike
Oooh people, go look http://mother-of-reinvention.blogspot.co.uk/2016/02/a-century-of-style-exhibition-at.html?showComment=1454848777063#c2856166567570244776
LikeLike
I think after swearing up a blue streak I would go with option 3. When I eventually calmed down I would be looking for a way to make it look like I had made just what was on the instructions whilst rejigging everything like a mad thing.
Good luck.
LikeLiked by 1 person